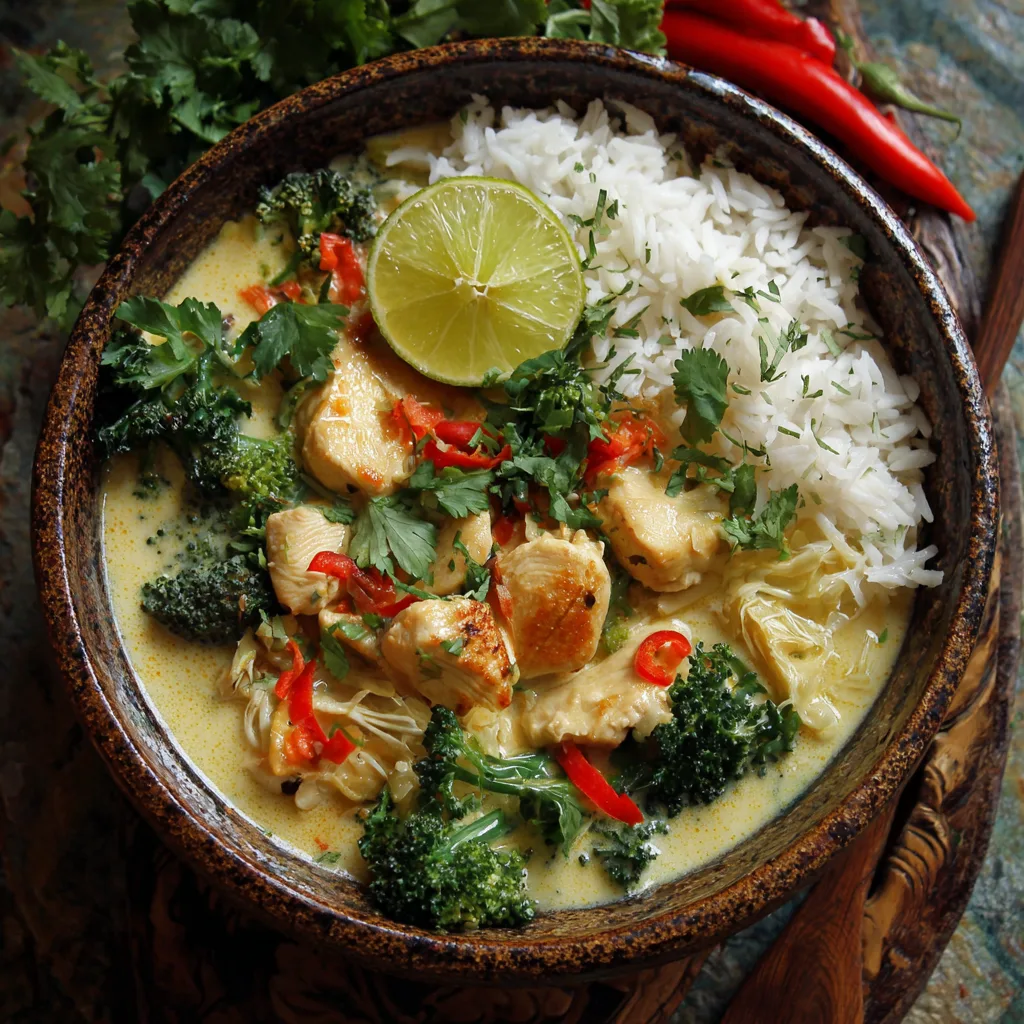
Gluten-Free Thai Curry (Easy and Nourishing) transforms fresh vegetables, aromatic ginger, garlic, and creamy coconut milk into a vibrant one-pot meal ready in 40 minutes—naturally gluten-free, dairy-free, and bursting with the bold, complex flavors of authentic Thai cuisine without requiring hard-to-find ingredients.
Chef Rachel created this gluten-free Thai curry easy and nourishing after realizing that most Thai curries are already naturally gluten-free when you use tamari or coconut aminos instead of regular soy sauce, and verified gluten-free curry paste.
Gluten-Free Thai Curry (Easy and Nourishing)
Ingredients
Equipment
Method
- Prep all vegetables: Chop onion, mince garlic, grate ginger. Slice bell peppers into strips. Peel and slice carrots diagonally. Cube sweet potato if using. Prepare broccoli florets and slice kale thinly.
- Start rice if serving (brown rice takes 30 minutes; follow package directions for other types).
- Warm large Dutch oven or deep skillet over medium heat. Add 1 tbsp coconut oil. Add onion and pinch of salt. Cook 5 minutes until translucent. Add ginger and garlic, cook 30 seconds until fragrant, stirring continuously.
- Add curry powder and turmeric, stir 30 seconds. Add Thai red curry paste and cook 2 minutes, stirring often, to bloom the paste.
- Add bell peppers and carrots (and sweet potato if using). Cook 3-5 minutes until fork-tender. If using sweet potato, cover and cook 5-7 minutes.
- Add broccoli florets. Cover and cook 3-5 minutes until bright green and tender-crisp.
- Add full-fat coconut milk, ½ cup water, tomato paste, kale, and coconut sugar. Stir to combine. Bring to simmer over medium heat. Reduce heat and simmer gently 5-10 minutes until all vegetables are tender. Curry will thicken as it simmers.
- Remove from heat. Season with tamari and rice vinegar or lime juice. Add salt to taste (about ¼ tsp). Adjust seasonings—add more tamari for depth or more vinegar/lime for brightness.
- Fluff rice with fork and season with salt. Divide rice among 4 bowls and ladle curry over top. Garnish with fresh basil or cilantro and optional red pepper flakes. Serve with lime wedges and sriracha on side.
Notes
Cook Time: 25 minutes
Total Time: 40 minutes
Servings: 4 Calories
Approximately 230 kcal per serving (without rice).
Protein
Approximately 15.5 g protein per serving (with chicken). Without protein, about 5g from vegetables.
She discovered that building layers of flavor—toasting aromatics first, blooming the curry paste, then simmering vegetables in rich coconut milk—creates restaurant-quality Thai curry at home that’s actually healthier and tastier than takeout.
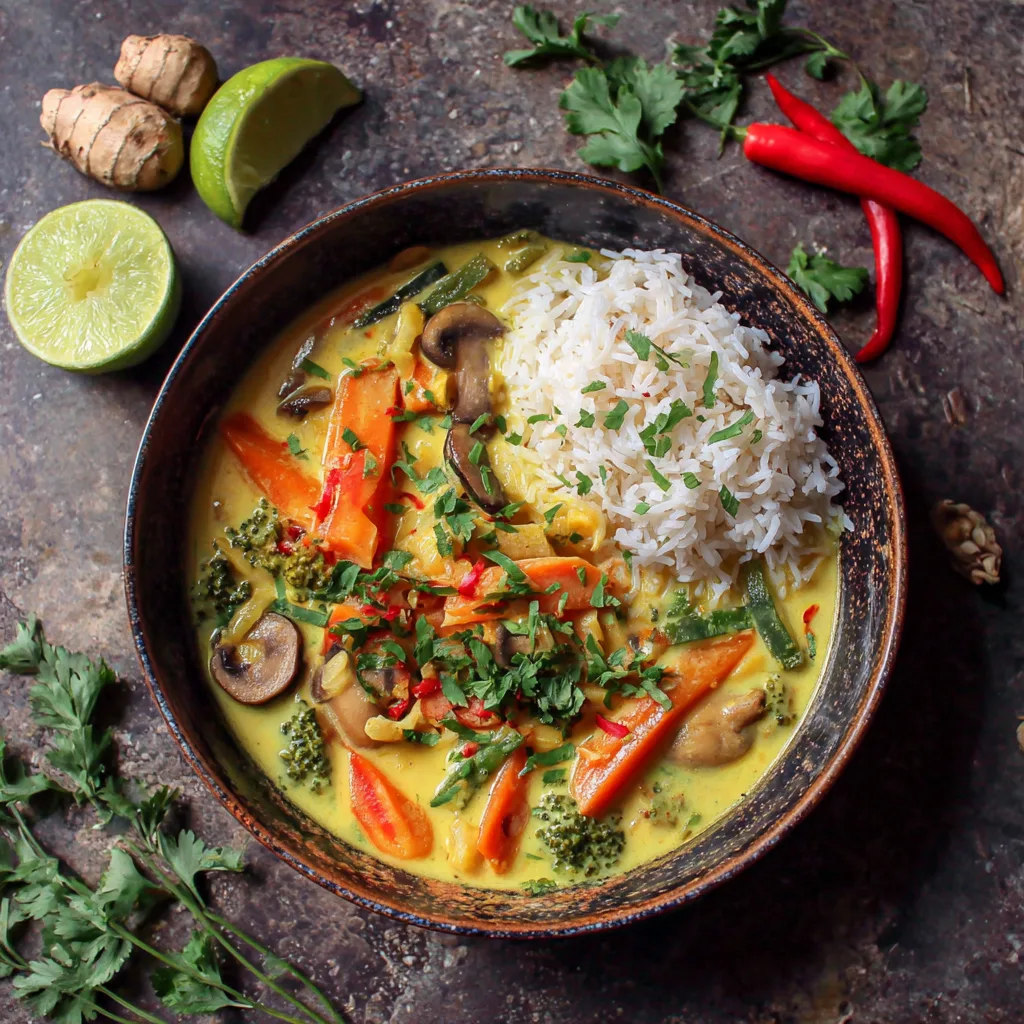
The method is brilliant: sauté onions with fresh ginger and garlic until fragrant, stir in Thai red curry paste to release its essential oils, add colorful vegetables like bell peppers and carrots, then simmer everything in full-fat coconut milk until tender. A splash of lime juice and rice vinegar at the end brightens all those rich flavors, creating a perfectly balanced curry that feels indulgent yet nourishing.
These bold Thai flavors complement favorites like Mediterranean Grain Bowls, One-Pot Moroccan Chicken Meal Prep, and Vegan Moroccan Stew with Warm Spices for a full week of globally inspired meals.
Her friend Mery, who follows a gluten-free diet due to celiac disease, loves how this curry delivers all the craveable flavors of her favorite Thai restaurant without worrying about hidden gluten or cross-contamination.
Summary
This gluten-free Thai curry easy and nourishing layers red bell peppers, yellow peppers, carrots, and kale in creamy coconut milk enriched with Thai red curry paste, fresh ginger, garlic, tamari, and a touch of coconut sugar for authentic sweet-savory-spicy Thai balance in 40 minutes. The curry is naturally gluten-free, dairy-free, vegan-friendly, and Whole30 compliant when you use coconut aminos instead of tamari.
What makes this Thai curry exceptional:
- 40-minute total time from start to finish with simple steps.
- One-pot cooking means minimal cleanup and maximum flavor integration.
- Naturally gluten-free when using tamari or coconut aminos and verified curry paste.
- Customizable vegetables — use whatever fresh or frozen vegetables you have.
- Meal prep friendly — flavors improve overnight and reheats beautifully.
The recipe serves four generously, making it perfect for family dinners or meal prep that tastes even better the next day.
Equipment
For gluten-free Thai curry easy and nourishing, minimal equipment required:
- Large Dutch oven, deep skillet, or heavy pot with lid.
- Sharp knife and cutting board for vegetable prep.
- Wooden spoon or spatula for stirring.
- Measuring cups and spoons for ingredients.
- Microplane grater or small grater for fresh ginger.
- Can opener for coconut milk.
Optional but helpful:
- Large pot for cooking rice separately.
- Ladle for serving into bowls.
Ingredients

For the Aromatic Base
- 1 tablespoon coconut oil (or olive oil).
- 1 small white or yellow onion, chopped (about 1 cup).
- Pinch of salt, plus more to taste.
- 1 tablespoon finely grated fresh ginger (about 1-inch nub).
- 2 cloves garlic, pressed or minced.
For the Thai Curry Paste and Spices
- 2 tablespoons Thai red curry paste (ensure gluten-free).
- 1 tablespoon curry powder.
- ½ tablespoon ground turmeric.
- ½ teaspoon cayenne pepper (adjust for heat preference).
For the Vegetable Base
- 1 red bell pepper, sliced into thin 2-inch strips.
- 1 yellow, orange, or green bell pepper, sliced into thin strips.
- 3 carrots, peeled and sliced diagonally into ¼-inch rounds (about 1 cup).
- 2 cups cubed sweet potato (optional but recommended).
- 3 cups broccoli florets.
- 1½ cups packed thinly sliced kale (tough ribs removed), preferably Tuscan/lacinato.
For the Creamy Coconut Base
- 1 can (14 oz) full-fat coconut milk (must contain guar gum for creaminess).
- ½ cup water.
- 1 tablespoon tomato paste.
For Finishing and Serving
- 1½ teaspoons coconut sugar or brown sugar.
- 1 tablespoon gluten-free tamari or coconut aminos.
- 2 teaspoons rice vinegar or fresh lime juice.
- Handful of chopped fresh basil or cilantro for garnish.
- Optional: red pepper flakes, sriracha, or chili garlic sauce for extra heat.
For Serving
Ingredient notes:
- Thai red curry paste: Look in the Asian section; Thai Kitchen brand is gluten-free and vegetarian. Always verify labels as some brands contain fish sauce or shrimp paste.
- Full-fat coconut milk: Must use regular (not light) coconut milk that contains guar gum for rich, creamy texture. Native Forest Classic brand recommended.
- Gluten-free tamari: Use instead of regular soy sauce for certified gluten-free curry. Coconut aminos work for Whole30 compliance.
- Fresh ginger: Essential for authentic Thai flavor; don’t substitute with ground ginger.
- Vegetables: Use any combination totaling about 6-7 cups; the recipe is very flexible.
Directions
Follow these steps for perfect gluten-free Thai curry easy and nourishing every time.
Step 1: Prep all vegetables and aromatics
Chop onion, mince garlic, and grate fresh ginger using a microplane or small grater. Slice bell peppers into thin 2-inch strips. Peel and slice carrots diagonally into ¼-inch rounds. If using sweet potato, peel and cube into ¾-inch pieces. Prepare broccoli florets and slice kale thinly, removing tough center ribs. Having everything prepped (mise en place) makes the cooking process seamless since this recipe moves quickly.
Step 2: Start rice (if serving)
If serving with rice, start cooking it now so it’s ready when the curry finishes. For brown rice, bring a large pot of water to boil, add rinsed rice, and boil for 30 minutes. Drain, return to pot, cover, and let rest 10 minutes. For jasmine or basmati rice, follow package directions. For cauliflower rice, prepare at the end.
Step 3: Sauté aromatics
Warm a large Dutch oven or deep skillet over medium heat. Once hot, add 1 tablespoon coconut oil. Add chopped onion and a pinch of salt. Cook, stirring often, until onion has softened and is turning translucent, about 5 minutes. Add grated ginger and minced garlic and cook until fragrant, about 30 seconds, stirring continuously to prevent burning. The kitchen will smell incredible!
Step 4: Toast spices and curry paste
Add curry powder and turmeric to the aromatics and stir for 30 seconds until fragrant. Then add Thai red curry paste and cook, stirring often, for 2 minutes. This crucial step “blooms” the curry paste, releasing its essential oils and deepening the flavor dramatically. The paste should darken slightly and become very aromatic.
Step 5: Cook firmer vegetables first
Add bell peppers and carrots (and sweet potato if using). Cook until bell peppers are fork-tender, 3-5 minutes, stirring occasionally. If using sweet potato, cover with lid and cook 5-7 minutes, adding a splash of water if vegetables stick. The vegetables should be slightly softened but still have texture.
Step 6: Add broccoli for brief cooking
Add broccoli florets to the pot. Cover with lid and cook for another 3-5 minutes. The broccoli should turn bright green and become tender-crisp.
Step 7: Add coconut milk and simmer
Add full-fat coconut milk, ½ cup water, tomato paste, kale, and coconut sugar. Stir to combine thoroughly. Bring the mixture to a simmer over medium heat. Once simmering, reduce heat to maintain a gentle simmer and cook until all vegetables have softened to your liking, about 5-10 minutes, stirring occasionally. The curry will thicken as it simmers and the flavors will meld beautifully. The kale will wilt into the sauce.
Step 8: Finish with bright flavors
Remove the pot from heat. Season with tamari (or coconut aminos) and rice vinegar or lime juice. Taste and add salt as needed (about ¼ teaspoon for optimal flavor). If the curry needs more punch, add ½ teaspoon more tamari. For more acidity and brightness, add ½ teaspoon more rice vinegar or squeeze of fresh lime. This final seasoning brings all the flavors into perfect balance.
Step 9: Serve immediately
Fluff cooked rice with a fork and season with a pinch of salt. Divide rice among four bowls and ladle generous portions of curry over the top. Garnish each bowl with chopped fresh basil or cilantro and optional red pepper flakes. Serve with lime wedges on the side and sriracha or chili garlic sauce for those who want extra heat.
Storage and reheating:
Store leftover curry and rice separately in airtight containers refrigerated for up to 4-5 days. The curry actually tastes better the next day as flavors continue developing! Reheat curry gently on the stovetop over medium-low heat or in the microwave for 2-3 minutes, stirring halfway through. Add a splash of coconut milk or water if it’s thickened too much. Freeze curry (without rice) for up to 3 months in freezer-safe containers. Thaw overnight in refrigerator before reheating.
Tips and Variations
Protein Additions
Chicken: Add 1 lb chicken breast or thighs cut into 1-inch pieces. Cook chicken with the spices in Step 4 for 5-7 minutes until browned, remove and set aside, then add back in Step 7 with coconut milk.
Tofu: Use 14 oz extra-firm tofu, pressed and cubed. Bake at 425°F for 25 minutes until crispy, then add with coconut milk in Step 7. Baking improves texture dramatically.
Shrimp: Add 1 lb peeled, deveined shrimp during the last 5 minutes of simmering until pink and cooked through.
Chickpeas: Add 1-2 cans drained chickpeas with the coconut milk for plant-based protein.
Edamame: Stir in 1-2 cups shelled edamame during the last 5 minutes for plant protein.
Vegetable Variations
Cauliflower: Use instead of or in addition to broccoli for cruciferous nutrition.
Mushrooms: Add 2 cups sliced mushrooms with the bell peppers for umami depth.
Zucchini or yellow squash: Slice and add during the last 5 minutes to prevent mushiness.
Butternut squash: Cube and use instead of sweet potato; may require longer cooking time.
Snap peas or snow peas: Add during last 3-4 minutes for crisp-tender texture.
Baby spinach: Stir in 2 cups with the kale or instead of kale.
Eggplant: Dice and add with bell peppers; it becomes meltingly tender.
Curry Paste Variations
Thai green curry paste: Substitute for red curry paste for different flavor profile—slightly more herbaceous.
Thai yellow curry paste: Milder and slightly sweeter than red curry.
Adjust heat level: Use 1 tablespoon curry paste for mild, 2 tablespoons for medium, 3 tablespoons for spicy.
Homemade curry paste: Make your own if you can’t find gluten-free versions, though Thai Kitchen brand works great.
Coconut Milk Adjustments
Extra creamy: Use 1½ cans coconut milk and reduce water to ¼ cup for ultra-rich curry.
Lighter version: Use lite coconut milk, though it won’t be as rich and creamy.
Thicker curry: Simmer longer to reduce liquid and intensify flavors.
Saucier curry: Add extra ½ can coconut milk if you want more sauce for rice.
Spice Customizations
More heat: Increase cayenne to 1 teaspoon or add fresh Thai chilies.
Less heat: Omit cayenne entirely for mild, family-friendly curry.
Lemongrass: Add 2 stalks lemongrass (bruised and tied in knot) with coconut milk; remove before serving for authentic Thai aroma.
Thai basil: Use Thai basil instead of regular basil for more authentic flavor.
Kaffir lime leaves: Add 3-4 leaves with coconut milk for traditional Thai citrus aroma.
Serving Suggestions
Jasmine rice: Traditional and perfect for soaking up curry sauce.
Brown rice: Whole grain option with nutty flavor and more fiber.
Cauliflower rice: Low-carb, grain-free option for keto or paleo diets.
Quinoa: Higher protein grain option.
Rice noodles: Serve curry over gluten-free rice noodles for change of pace.
Fresh herbs: Garnish generously with fresh cilantro, basil, or mint.
Crushed peanuts: Sprinkle toasted peanuts over top for crunch and protein (skip for nut-free).
Lime wedges: Always serve with extra lime—the acid brightens every bite.
Nutrition Facts
Estimated nutrition per serving without rice (recipe makes 4 servings).
| Nutrient | Amount |
|---|---|
| Calories | 230 kcal |
| Protein | 15.5 g |
| Carbohydrates | 15 g |
| Fiber | 3.6 g |
| Total Fat | 12.9 g |
| Saturated Fat | 10 g |
| Cholesterol | 41 mg |
| Sodium | 150 mg |
| Sugar | 5.6 g |
| Vitamin A | 2611 IU |
| Vitamin C | 51 mg |
| Calcium | 43 mg |
| Iron | 1.7 mg |
Nutritional Highlights
This gluten-free Thai curry easy and nourishing delivers impressive nutritional value with just 230 calories per serving (without rice), making it a light yet satisfying meal perfect for health-conscious eaters. The 15.5 grams of protein from chicken or plant-based alternatives supports muscle maintenance and keeps you satiated for hours.
The vitamin A content is exceptional (2611 IU, or about 52% of daily needs) from carrots, bell peppers, and sweet potato, supporting immune function, healthy vision, and skin health. The remarkable vitamin C (51 mg, or 62% of daily value) from bell peppers, broccoli, and lime juice acts as a powerful antioxidant and enhances iron absorption from plant-based ingredients.
Full-fat coconut milk provides 10g saturated fat per serving, which comes from medium-chain triglycerides (MCTs) that are metabolized differently than other saturated fats. MCTs are quickly converted to energy rather than stored as fat, and they may support brain health and provide sustained energy. The richness from coconut milk makes this curry feel indulgent while providing beneficial fats.
Fresh aromatics—ginger, garlic, and turmeric—deliver more than flavor. Ginger aids digestion and has anti-inflammatory properties. Garlic supports cardiovascular health and immune function. Turmeric contains curcumin, a powerful anti-inflammatory compound studied for numerous health benefits. These aromatic spices have been used in traditional medicine for centuries.
The fiber content (3.6g per serving) from vegetables supports digestive health and helps regulate blood sugar levels. When served over brown rice, total fiber increases to 5-6g per meal, promoting satiety and supporting gut health.
Dietitian Tips
For higher protein needs: Add chicken breast, shrimp, or extra-firm baked tofu to increase protein to 30-35g per serving. This makes the curry substantial enough for athletes or very active individuals.
For blood sugar management: The combination of protein (15.5g), fiber (3.6g), and healthy fats (12.9g) creates excellent blood sugar stability. Those managing diabetes can serve over cauliflower rice instead of white rice to further lower the glycemic load. The small amount of coconut sugar (less than 2g per serving) provides traditional Thai sweetness without excessive added sugar.
For weight management: At just 230 calories per generous serving, this curry delivers incredible volume and satisfaction without excess calories. The protein and healthy fats promote satiety, while the abundance of low-calorie vegetables provides filling fiber. For even lower calories, use lite coconut milk (saves 60-80 calories per serving) and serve over cauliflower rice.
For heart health: This naturally dairy-free curry supports cardiovascular wellness. The anti-inflammatory compounds from ginger, garlic, turmeric, and abundant vegetables promote heart health. Using low-sodium tamari or coconut aminos keeps sodium moderate at just 150mg per serving—excellent for blood pressure management.
For celiac disease and gluten sensitivity: This curry is naturally gluten-free when you verify that curry paste contains no gluten and use tamari or coconut aminos instead of regular soy sauce. Many Thai curries contain hidden gluten from soy sauce or thickeners, so making it at home ensures safety for those with celiac disease.
For meal prep success: The flavors in this curry actually improve overnight as spices continue mellding, making it one of the best meal prep options. Many testers report the curry tastes even better on day 2 and 3 than when freshly made. Store curry and rice separately to maintain optimal texture.
FAQs – 6 Frequently Asked Questions
Q1: Is Thai curry naturally gluten-free, or do I need to modify the recipe?
A: Thai curry is naturally gluten-free when you verify two key ingredients. First, check your Thai curry paste label—most brands like Thai Kitchen are gluten-free, but some contain fish sauce with wheat or soy sauce with gluten. Always look for “gluten-free” on the label or check ingredients. Second, use tamari (gluten-free soy sauce) or coconut aminos instead of regular soy sauce, which contains wheat. Beyond those two ingredients, everything else in Thai curry—coconut milk, fresh vegetables, aromatics, spices—is naturally gluten-free. This makes Thai cuisine one of the easiest to adapt for gluten-free diets! If you have celiac disease or severe gluten sensitivity, also verify that your curry powder and other spices haven’t been processed in facilities with cross-contamination risks.
Q2: Can I use lite coconut milk instead of full-fat to reduce calories and fat?
A: You can, but the curry won’t be as rich and creamy. Full-fat coconut milk contains guar gum (a natural thickener) that creates that characteristic velvety, restaurant-quality texture. Lite coconut milk has less fat and often lacks guar gum, resulting in a thinner, less satisfying sauce. The fat in coconut milk also helps your body absorb the fat-soluble vitamins (A, D, E, K) from all those colorful vegetables. That said, if you’re strictly managing calories or fat intake, lite coconut milk will work—just expect a thinner consistency. You could compromise by using one can full-fat and one can lite for medium richness. The full-fat version only adds about 60-80 calories per serving, and those calories come from beneficial MCT fats that your body uses differently than other fats, so it’s worth it for optimal flavor and satisfaction!
Q3: My curry turned out watery and thin, not thick like restaurant curry. What went wrong?
A: Several factors can cause thin curry. First, make sure you’re using full-fat coconut milk that contains guar gum—check the ingredients list. Brands like Native Forest Classic work best. Second, you may have added too much water; start with just ½ cup and add more only if needed. Third, the curry needs adequate simmering time (5-10 minutes) to thicken as liquid reduces and vegetables release their starches. If your curry is still too thin after simmering, here’s the fix: let it simmer uncovered for 5-10 more minutes to reduce and concentrate the sauce. You can also mash some of the cooked vegetables against the side of the pot to release their starches and naturally thicken the sauce. For future batches, remember that curry continues thickening as it sits—what seems thin when freshly made will be perfect after 10 minutes of resting!
Q4: Can I make this Thai curry in a slow cooker or Instant Pot for even easier prep?
A: While this curry is already quite easy at 40 minutes, you can adapt it for slow cooker or Instant Pot. For slow cooker: Sauté aromatics and curry paste in a skillet first (Steps 3-4), then transfer to slow cooker with all other ingredients except kale and finishing seasonings. Cook on low 4-6 hours or high 2-3 hours. Add kale, tamari, and rice vinegar during last 15 minutes. For Instant Pot: Use sauté function for Steps 3-4, then add vegetables, coconut milk, water, and seasonings. Pressure cook on high for 5 minutes, quick release, then stir in kale until wilted. Finish with tamari and lime juice. However, most testers prefer the stovetop method because it gives you more control over vegetable texture—Instant Pot can overcook delicate vegetables. The 40-minute stovetop time is already so quick that slow cooker or pressure cooker don’t save much time!
Q5: What’s the difference between red, green, and yellow Thai curry paste? Can I use them interchangeably?
A: Red, green, and yellow Thai curry pastes have different flavor profiles but can be used interchangeably in recipes based on preference. Red curry paste (used in this recipe) is made from dried red chilies, garlic, lemongrass, and galangal—it’s medium spicy with balanced, earthy flavor. Green curry paste uses fresh green chilies, Thai basil, cilantro, and lime zest—it’s typically spicier and more herbaceous with brighter, grassier notes. Yellow curry paste includes turmeric, cumin, and coriander—it’s the mildest with warm, slightly sweet, curry-like flavor. You can absolutely swap them! If using green curry paste, reduce or omit additional cayenne since it’s naturally spicier. If using yellow curry paste, you might want to add a bit more for depth since it’s milder. All three work beautifully with coconut milk and vegetables, so choose based on your heat preference and flavor profile you crave!
Q6: This recipe has so many vegetables—can I just use frozen stir-fry vegetables to save time?
A: Absolutely! Frozen stir-fry vegetable mixes are perfect for this curry and save significant prep time. Look for mixes that include bell peppers, broccoli, carrots, snap peas, and other Asian-style vegetables. Use about 4-6 cups frozen vegetables. Skip the separate vegetable cooking steps (Steps 5-6) and instead add all the frozen vegetables directly to the pot after blooming the curry paste. Add coconut milk, water, and seasonings, then bring to simmer and cook 10-12 minutes until vegetables are tender. Frozen vegetables may release more liquid as they thaw and cook, so you might need slightly less water (start with ¼ cup instead of ½ cup). The texture will be slightly different than fresh vegetables—a bit softer—but the flavor will still be delicious and you’ll save 10-15 minutes of prep time! This makes the recipe even easier for busy weeknights.
Conclusion
Gluten-free Thai curry easy and nourishing proves that bold, restaurant-quality Thai flavors are completely accessible at home without spending hours in the kitchen or hunting for obscure ingredients. The brilliant method—building layers of flavor by toasting aromatics, blooming curry paste, then simmering colorful vegetables in rich coconut milk—creates authentic Thai taste in just 40 minutes. The combination of fresh ginger, garlic, Thai red curry paste, creamy coconut milk, and bright lime juice delivers that addictive sweet-savory-spicy-tangy balance that makes Thai cuisine so craveable.
These vibrant Thai flavors complement Chef Rachel’s other globally inspired recipes beautifully. She often rotates between this gluten-free Thai curry, Mediterranean Grain Bowls, One-Pot Moroccan Chicken Meal Prep, and Vegan Moroccan Stew with Warm Spices to keep her weekly routine interesting without repeating cuisines.
Her friend Mery, who has celiac disease and must avoid gluten strictly, calls this recipe her “Thai restaurant replacement”—she no longer worries about cross-contamination or hidden gluten because making it at home means she knows exactly what’s in every delicious bite.
The beauty of gluten-free Thai curry easy and nourishing lies in its flexibility and forgiving nature. Use whatever vegetables you have, add chicken or tofu or keep it vegan, increase the heat or keep it mild, serve over rice or cauliflower rice—the aromatic curry paste and coconut milk make everything delicious. Whether you’re gluten-free by necessity or choice, vegetarian, vegan, paleo, Whole30, or simply looking for a healthy dinner that tastes like takeout, this one-pot curry delivers comfort, nourishment, and that cozy feeling that only comes from a bowl of rich, aromatic curry that brings the bold flavors of Thailand straight to your weeknight table.
More recipes in mealzyt.com.