Thai Chicken Skillet (Fast and Flavorful) is a magnificently aromatic, 30-minute dinner that combines tender chicken pieces with vibrant bell peppers, shallots, and aromatic garlic in a luscious coconut milk sauce infused with peanut butter, lemongrass, ginger, and bright lime juice—all cooked in a single skillet for maximum flavor and minimal cleanup.
Chef Rachel developed this streamlined version after falling in love with Thai restaurant flavors but wanting something faster and more customizable, creating a Thai chicken skillet technique that delivers restaurant-quality results with weeknight simplicity.

Thai Chicken Skillet (Fast and Flavorful)
Ingredients
Equipment
Method
- Cut chicken into 1-inch pieces. Add to bowl and toss thoroughly with cornstarch and generous pinch of salt.
- Heat 12-inch cast-iron skillet over medium-high heat. Add enough oil to coat bottom. Once hot, add chicken and cook 2-3 minutes per side until browned. Transfer to plate.
- Lower heat to medium. Add shallots and red peppers, plus more oil if needed. Season with salt. Sauté 8 minutes, stirring often, until browned and tender.
- Bruise lemongrass with back of knife and add to skillet along with fresno chile, garlic, ginger, and red pepper flakes. Cook 1 minute until fragrant.
- Stir in peanut butter, coconut milk, and chicken stock. Mix well and bring to simmer.
- Add chicken back to skillet. Simmer on low heat 10 minutes until chicken is cooked through (165°F internal temp).
- Stir in soy sauce, fish sauce, honey, and lime juice. Simmer 2 more minutes. Taste and adjust seasoning as needed.
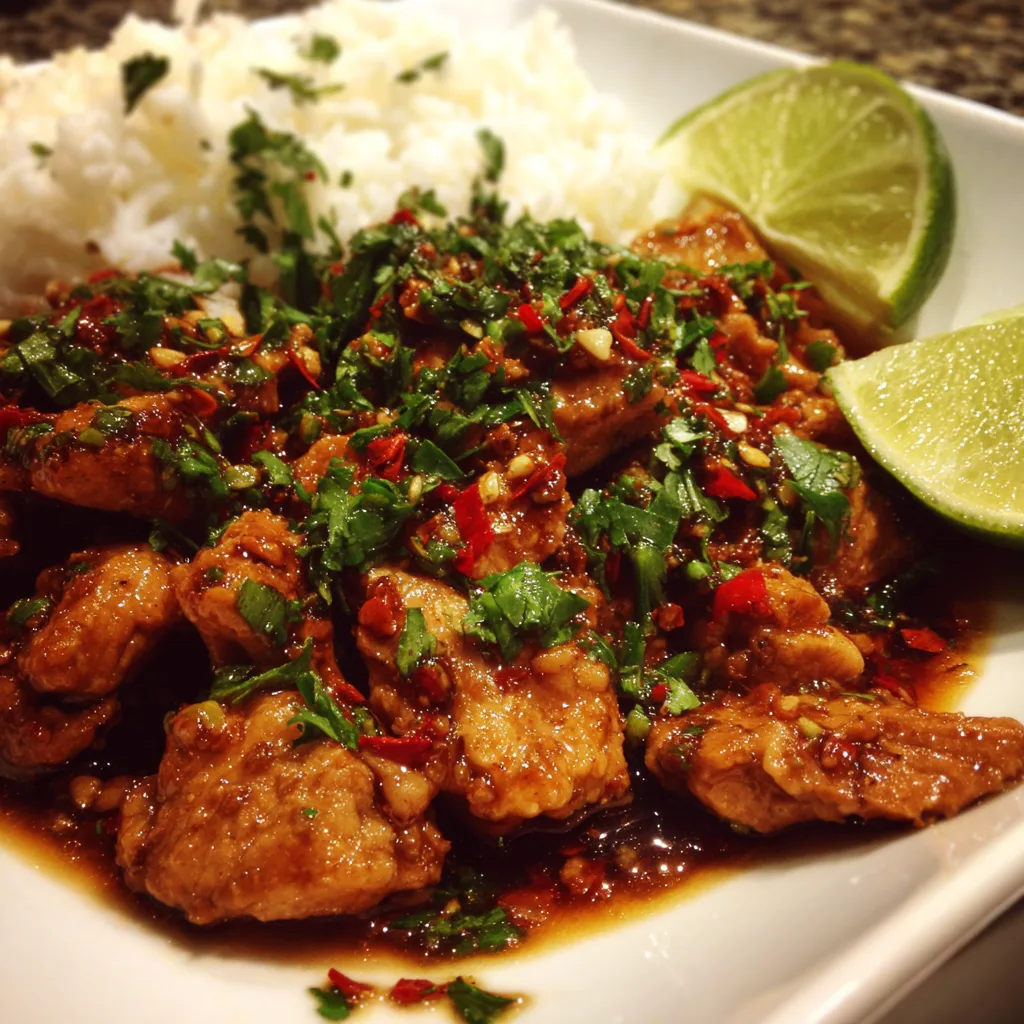
- Remove lemongrass stalk. Serve over jasmine rice. Top with peanuts, scallions, cilantro, and more red pepper flakes if desired. Serve with lime wedges.
Notes
Approximately 520 kcal per serving without rice (4 servings) Protein
Approximately 42 g protein per serving from chicken and peanut butter
The genius of this fast and flavorful Thai chicken lies in how the sauce builds layer by layer—caramelized shallots and peppers form the base, aromatics like ginger, garlic, and lemongrass add complexity, then peanut butter and coconut milk create that signature creamy texture Thai cuisine is known for.
Unlike complicated multi-step Thai recipes, this skillet method streamlines everything without sacrificing any of the bold, balanced flavors.
Chef Rachel’s friend Mery, who spent months backpacking through Thailand eating at every street stall she could find, taste-tested this recipe and declared it “shockingly authentic”—the balance of sweet, savory, tangy, and spicy hits all the right notes, while the creamy coconut-peanut sauce rivals the best Thai restaurants. Whether you’re meal prepping for the week, feeding a family on a busy Tuesday, or impressing dinner guests with minimal effort, this Thai chicken skillet proves that spectacular food doesn’t require hours in the kitchen.
For more quick Thai skillets, explore our Quick One-Pan Thai Chicken and Veggies or try our Thai Basil Chicken Rice — Simple Dinner for aromatic basil-forward flavors.
Summary
This Thai Chicken Skillet (Fast and Flavorful) combines bite-sized chicken breast (tossed in cornstarch for a velvety texture) with caramelized shallots and red bell peppers in a creamy sauce made from peanut butter, coconut milk, chicken stock, soy sauce, fish sauce, honey, and fresh lime juice—accented with lemongrass, ginger, garlic, and optional Thai chilies for heat. The result is a complete meal served over rice and topped with crushed peanuts, scallions, and cilantro in under 30 minutes.
Why this Thai Chicken Skillet works:
- Restaurant flavors in 30 minutes—faster than ordering takeout!
- The cornstarch-coated chicken stays incredibly tender—creates luxurious texture
- Layers of flavor build in the pan—caramelized vegetables, aromatics, then creamy sauce
- One skillet from start to finish—minimal cleanup for maximum flavor
- Peanut butter + coconut milk = magic—creates that signature Thai creaminess
- Perfect balance of sweet-savory-tangy-spicy—every element in harmony
- Meal prep champion—leftovers are even better the next day!
The key is browning the cornstarch-coated chicken first to lock in moisture, then building the sauce with properly caramelized vegetables before adding the creamy components—this creates depth you simply can’t achieve by dumping everything in at once.
Equipment
Essential tools for making Thai Chicken Skillet:
- Large 12-inch cast-iron skillet OR large skillet – Cast iron provides excellent heat retention and browning
- Sharp chef’s knife – For cutting chicken into uniform pieces and slicing vegetables
- Cutting board – For prep work
- Measuring cups and spoons – For precise sauce ratios
- Mixing bowl – For tossing chicken with cornstarch
- Wooden spoon or silicone spatula – For stirring and scraping
- Microplane or fine grater – For grating fresh ginger
- Small prep bowls – For organizing ingredients (mise en place)
Optional but helpful:
- Meat thermometer to check chicken doneness (165°F)
- Tongs for flipping chicken pieces
- Whisk for combining sauce ingredients

Ingredients
For the Thai Chicken Skillet (Fast and Flavorful):
Chicken:
- 1½ pounds boneless, skinless chicken breast (or thighs)
- 2 tablespoons cornstarch
- Kosher salt
- Vegetable oil for cooking
Vegetables:
- 1 shallot, thinly sliced
- 2 red bell peppers, cored and thinly sliced
- 6 cloves garlic, minced
- 1 tablespoon minced fresh ginger
- 1 red fresno chile pepper, thinly sliced (optional, for heat)
- 2-inch piece lemongrass, bruised
- ½ teaspoon red pepper flakes, plus more for topping
Sauce:
- ½ cup creamy peanut butter
- 1 can (13.5 fl oz) coconut milk
- ¾ cup chicken stock
- 1 tablespoon soy sauce
- 1 tablespoon fish sauce
- 1 tablespoon honey
- 1 lime, juiced, plus lime wedges for serving
For Serving:
- Cooked jasmine rice
- ½ cup toasted peanuts, chopped
- 4 scallions, thinly sliced
- 1 small handful cilantro leaves
Ingredient notes:
- Cornstarch coating: Creates velvety texture and helps sauce cling to chicken
- Chicken thighs vs. breasts: Thighs stay juicier and more flavorful; breasts are leaner
- Lemongrass: Bruise with the back of your knife to release aromatic oils
- Peanut butter: Use natural, creamy peanut butter without added sugar
- Fish sauce: Essential for authentic umami depth—don’t skip it!
- Fresno chile: Provides medium heat; substitute jalapeño or omit for mild version
Directions
Step 1: Prepare and coat the chicken
Cut the chicken breast into approximately 1-inch pieces for even cooking. Add the chicken pieces to a mixing bowl and toss thoroughly with 2 tablespoons cornstarch and a generous pinch of kosher salt. The cornstarch creates a light coating that helps the chicken stay moist during cooking and gives it a luxurious, velvety texture. Make sure every piece is evenly coated.
Step 2: Brown the chicken
Heat a 12-inch cast-iron skillet (or large regular skillet) over medium-high heat. Add enough vegetable oil to just coat the bottom of the pan—you want a thin layer. Once the oil is hot and shimmering, add the cornstarch-coated chicken pieces in a single layer. Don’t crowd the pan—work in batches if necessary to avoid steaming. Cook the chicken for 2-3 minutes per side without moving it until nicely browned. The chicken doesn’t need to be fully cooked through at this point—it will finish cooking later in the sauce. Transfer the browned chicken to a plate and set aside.
Step 3: Caramelize the vegetables
Lower the heat to medium. Add the thinly sliced shallots and red bell peppers to the same skillet, plus a little more oil if needed. Season with a pinch of salt. Sauté for about 8 minutes, stirring often, until the vegetables are browned and tender. This caramelization step is crucial—it develops deep, sweet flavors that form the base of your sauce. Don’t rush this step!
Step 4: Add aromatics
Take the 2-inch piece of lemongrass and bruise it with the back of your knife to release its aromatic oils, then add it to the skillet. Add the sliced fresno chile (if using), minced garlic, minced ginger, and red pepper flakes. Cook for another minute or so, stirring constantly, until the garlic becomes fragrant and the ginger releases its aroma. Be careful not to burn the garlic—reduce heat if needed.
Step 5: Build the creamy sauce
Stir in the ½ cup creamy peanut butter, coconut milk, and chicken stock. Mix well with your wooden spoon or spatula, breaking up the peanut butter and incorporating it completely into the liquid. The sauce should be smooth and well combined. Bring the mixture to a gentle simmer.
Step 6: Simmer the chicken in sauce
Add the browned chicken pieces back to the skillet, nestling them into the sauce. Reduce heat to low and simmer gently for 10 minutes, or until the chicken is cooked through completely and reaches an internal temperature of 165°F. During this time, the chicken will finish cooking while absorbing all those incredible Thai flavors, and the sauce will thicken slightly.
Step 7: Finish with bright flavors
Stir in the soy sauce, fish sauce, honey, and fresh lime juice. These final additions brighten the entire dish—the lime juice adds tang, the soy and fish sauces add umami depth, and the honey balances everything with subtle sweetness. Simmer for another 2 minutes to let the flavors meld. Taste the sauce and adjust seasoning if desired—you could add more salt, soy sauce, fish sauce, honey for sweetness, or lime juice for tang.
Step 8: Serve immediately
Remove the lemongrass stalk (it’s inedible—it was just for aromatics). Serve the Thai chicken over fluffy jasmine rice, making sure to spoon plenty of that gorgeous sauce over everything. Top generously with chopped toasted peanuts for crunch, thinly sliced scallions, and fresh cilantro leaves. Serve lime wedges alongside so everyone can squeeze extra lime juice over their portion—this final hit of acidity is essential!
Pro cooking tips:
- Don’t skip the cornstarch—it creates that velvety texture characteristic of Asian stir-fries
- Caramelize the vegetables properly—this develops depth and sweetness
- Bruise the lemongrass—releases aromatic oils that infuse the sauce
- Simmer gently—high heat can cause the coconut milk to separate
- Adjust seasoning at the end—balance sweet, salty, tangy, and spicy to your taste
Tips and Variations
Customizing Your Thai Chicken Skillet
Protein options:
- Chicken breast (default): Lean and quick-cooking—use cornstarch for tender texture
- Chicken thighs: More flavorful and stay juicier—highly recommended
- Shrimp: Add raw shrimp directly to simmering sauce, cook 3-4 minutes until pink
- Tofu: Cube extra-firm tofu, press, pan-fry until crispy, add at the end
- Ground chicken: Brown ground chicken instead of pieces for faster cooking
- Mix proteins: Use half chicken, half shrimp for variety
Vegetable variations:
- What’s used: Shallots, red bell peppers
- Also try: Broccoli florets, snap peas, green beans, asparagus, zucchini, mushrooms
- Leafy greens: Add spinach or bok choy in the last 2 minutes of cooking
- More heat: Add sliced Thai bird chilies or jalapeños
- Color variation: Mix red, yellow, and orange bell peppers for visual appeal
Adjusting flavors:
- More sweet: Increase honey to 2 tablespoons
- More savory: Add extra soy sauce or fish sauce
- More tangy: Double the lime juice or add rice vinegar
- More spice: Increase red pepper flakes or add more fresh chilies
- More peanut flavor: Increase peanut butter to ¾ cup
Peanut butter substitutes:
- Almond butter: Creates slightly different but delicious flavor
- Cashew butter: Milder, creamier texture
- Sunflower seed butter: Perfect for nut-free version
- Tahini: For sesame-forward flavor (not traditional)
Lemongrass alternatives:
- Fresh lemongrass (best): Bruise and simmer, remove before serving
- Lemongrass paste: Use 2 teaspoons from a jar
- Lemon zest: Add zest of 1 lemon (not the same but works in a pinch)
- Skip it: The dish is still delicious without lemongrass
Coconut milk options:
- Full-fat coconut milk (recommended): Creates richest, creamiest sauce
- Lite coconut milk: Works but sauce will be thinner
- Coconut cream: For extra-rich sauce, mix with ¼ cup water
Making it healthier:
- Reduce calories: Use lite coconut milk and ⅓ cup peanut butter
- Increase vegetables: Double or triple vegetable content
- Use chicken breast: Leaner than thighs
- Reduce sodium: Use low-sodium soy sauce and reduce fish sauce
- Serve with cauliflower rice: For low-carb option
Serving suggestions:
- Over jasmine rice (traditional): The fragrant rice complements Thai flavors
- Over brown rice: For more fiber and nutrients
- Over rice noodles: Toss cooked rice noodles directly into the sauce
- Over zucchini noodles: Low-carb option
- As-is: The vegetables and chicken are substantial enough alone
Meal prep strategies:
- Leftovers keep beautifully for 3-4 days in airtight containers
- The flavors actually deepen and improve—day 2 is even better!
- Store rice separately from chicken and sauce for best texture
- Reheat gently on stovetop or in microwave, adding splash of coconut milk if needed
- Freeze portions for up to 3 months in freezer-safe containers
Nutrition Facts
| Nutrient | Per Serving (4 servings, without rice) |
|---|---|
| Calories | 520 kcal |
| Protein | 42 g |
| Total Fat | 32 g |
| Saturated Fat | 14 g |
| Carbohydrates | 18 g |
| Dietary Fiber | 4 g |
| Sugars | 10 g |
| Cholesterol | 110 mg |
| Sodium | 680 mg |
| Potassium | 785 mg |
| Vitamin A | 65% DV |
| Vitamin C | 180% DV |
| Calcium | 6% DV |
| Iron | 16% DV |
Nutritional analysis based on 4 servings using chicken breast, full-fat coconut milk, and peanut butter, excluding rice. Add ~200 calories if serving with 1 cup cooked jasmine rice.
Nutritional Highlights
High-quality protein powerhouse: With 42 grams of protein per serving, this Thai chicken skillet provides approximately 84% of the daily protein requirement for most adults. The combination of chicken and peanut butter creates a complete protein profile supporting muscle maintenance and satiety.
Healthy fats from coconut and peanuts: The 32 grams of fat per serving come primarily from coconut milk and peanut butter, providing medium-chain triglycerides (MCTs) and monounsaturated fats that support heart health and energy production. Peanuts are also rich in vitamin E, an important antioxidant.
Vitamin C explosion: One serving provides 180% of daily vitamin C needs from the red bell peppers—this powerful antioxidant supports immune function, skin health, and helps your body absorb the iron from the chicken.
Vitamin A for vision and immunity: With 65% of daily vitamin A needs per serving, the bell peppers and other ingredients support eye health, immune function, and cell growth.
Anti-inflammatory ingredients: Fresh ginger contains gingerol, garlic provides allicin, and turmeric (if added) offers curcumin—all studied for powerful anti-inflammatory and antioxidant properties.
Moderate carbohydrates: At only 18 grams of carbs per serving without rice, this dish is relatively low-carb. The carbs come primarily from the vegetables, honey, and natural sugars in the peanut butter.
Dietitian Tips
For balanced nutrition: This dish provides excellent protein and healthy fats but is light on carbohydrates and fiber as written. Serving over rice creates a more balanced meal, or increase vegetable content to boost fiber and micronutrients without adding many calories.
For weight management: At 520 calories per serving without rice, this is a moderate main dish. The high protein content (42g) promotes satiety and helps control appetite. To reduce calories, use lite coconut milk (saves ~100 calories per serving) and increase vegetable content for volume.
For athletes and active individuals: Add rice to provide carbohydrates for glycogen replenishment. The 42 grams of protein per serving supports muscle recovery after training. The anti-inflammatory ingredients may also aid exercise recovery.
For blood sugar management: The protein and fat naturally slow carbohydrate absorption. Without rice, this dish has minimal impact on blood sugar. If including rice, use brown rice for more fiber and a lower glycemic index, and limit portions to ½-¾ cup cooked.
For heart health: The abundant vegetables, garlic, and ginger support cardiovascular health. To optimize heart benefits, use low-sodium soy sauce, reduce or eliminate added salt, and consider using chicken breast (leaner than thighs). The potassium from vegetables helps counteract sodium’s effects on blood pressure.
For digestive health: Fresh ginger supports digestion and may reduce nausea and bloating. The fiber from vegetables and peanut butter feeds beneficial gut bacteria. Fish sauce provides trace probiotics from fermentation.
For families: This recipe can be made milder for children by omitting the fresno chile and red pepper flakes. The creamy peanut sauce appeals to most palates. Let adults add their own heat at the table with sriracha or chili crisp.
Allergen considerations:
- Contains peanuts—substitute with sunflower seed butter for nut-free version
- Contains soy (soy sauce)—use coconut aminos for soy-free
- Contains fish (fish sauce)—can substitute extra soy sauce though flavor won’t be as authentic
- Naturally dairy-free and gluten-free (if using tamari instead of soy sauce)
FAQs – 6 Frequently Asked Questions
Q1: Why do I need to coat the chicken in cornstarch?
A: The cornstarch coating serves multiple important purposes! First, it creates a velvety, luxurious texture on the chicken that you simply can’t achieve without it. The cornstarch forms a thin protective layer that keeps moisture locked inside the chicken, preventing it from drying out during the high-heat searing. Second, this coating helps the sauce cling better to the chicken pieces—without it, the sauce would slide right off and pool at the bottom of your bowl. Third, the cornstarch contributes to the overall silkiness of the sauce as tiny amounts dissolve during cooking. This technique is used extensively in Chinese and Thai restaurant cooking to create that characteristic tender, glossy texture. Don’t skip this step—tossing chicken in cornstarch takes literally 30 seconds and makes a dramatic difference in the final texture! You can substitute arrowroot starch or tapioca starch if you don’t have cornstarch.
Q2: Can I make this Thai chicken skillet without fish sauce?
A: Fish sauce is one of the key ingredients that makes Thai food taste authentically Thai—it provides a deep, savory umami flavor that’s difficult to replicate. While you technically can make this recipe without fish sauce by substituting extra soy sauce, you’ll be missing a significant layer of complexity and depth. Fish sauce isn’t “fishy” tasting when used correctly in Thai cooking—it adds a salty, savory richness similar to how anchovies enhance Italian pasta sauces without making them taste like fish. Many people who think they don’t like fish sauce actually love Thai food, not realizing it’s a key ingredient! If you’re truly opposed or have a fish allergy, use an additional 1 tablespoon of soy sauce in its place, but I encourage you to try the authentic version at least once. A bottle of fish sauce costs only a few dollars, lasts for months in the fridge, and transforms countless Asian dishes. Look for Thai or Vietnamese brands in the Asian section of your supermarket.

Q3: My coconut milk sauce looks separated or grainy—what went wrong?
A: Coconut milk can separate when heated too vigorously or when acidic ingredients (like lime juice) are added while it’s boiling. To prevent separation: (1) Simmer gently rather than boiling—high heat causes the coconut milk’s fats and proteins to separate. Once you add the coconut milk, keep the heat at medium-low for gentle simmering. (2) Add acidic ingredients at the end—wait until the sauce has simmered and thickened before stirring in the lime juice. (3) Stir the canned coconut milk well before adding—sometimes the cream separates from the liquid in the can, and adding it unevenly can cause texture issues. (4) Use full-fat coconut milk—lite coconut milk is more prone to separation. If your sauce does separate, try vigorously whisking it—often you can bring it back together. You can also blend it briefly with an immersion blender. The separated sauce will still taste delicious even if it’s not as visually appealing!
Q4: Can I use pre-cooked rotisserie chicken to make this even faster?
A: Yes! Using rotisserie chicken is a great shortcut that reduces cooking time to about 15 minutes. Here’s how to adapt the recipe: Skip steps 1 and 2 entirely (no need to cut and brown raw chicken). Proceed with caramelizing the vegetables and building the sauce as directed. Shred or cube the rotisserie chicken and add it to the finished sauce in step 6, simmering just 3-5 minutes to heat through rather than the full 10 minutes. Since the chicken is already cooked, you’re just warming it and letting it absorb the sauce flavors. The cornstarch coating creates that velvety texture on raw chicken, so you’ll miss that element, but the trade-off is significantly faster prep time. This is perfect for those super-busy nights when you need dinner in 15 minutes! You can also use leftover cooked chicken breast or thighs. A standard rotisserie chicken provides about 3-4 cups of shredded meat, which is more than enough for this recipe.
Q5: What if I can’t find fresh lemongrass?
A: Fresh lemongrass adds a wonderful citrusy-floral aroma to Thai cooking, but it’s not always easy to find. Here are your options: (1) Lemongrass paste—increasingly available in tubes in the produce section near ginger and garlic. Use about 2 teaspoons. (2) Frozen lemongrass—some Asian markets sell pre-chopped frozen lemongrass which works perfectly. (3) Lemon zest—while not the same flavor profile, the zest of 1-2 lemons adds brightness (add it with the other aromatics). (4) Skip it entirely—the dish will still be absolutely delicious without lemongrass because you have so many other aromatics (ginger, garlic, lime juice) providing flavor. If you do find fresh lemongrass, use only the bottom 4-6 inches of the stalk (the tender inner parts), and remember to bruise it with the back of your knife before adding to release the aromatic oils. Remove the lemongrass stalk before serving as it’s fibrous and inedible—it’s just for flavoring the sauce.
Q6: How do I store and reheat leftovers of this Thai chicken skillet?
A: Leftovers of this dish are fantastic—in fact, many people think it tastes even better the next day as the flavors continue to meld! Let the chicken and sauce cool completely, then transfer to airtight containers and store in the refrigerator for 3-4 days. For best results, store the rice separately from the chicken and sauce so the rice doesn’t absorb all the liquid and become mushy. To reheat: Place a portion in a microwave-safe bowl, add 1-2 tablespoons of water or coconut milk, cover loosely, and microwave on medium power for 2-3 minutes, stirring halfway through. The added liquid prevents the sauce from drying out. Alternatively, reheat gently in a skillet over medium-low heat, adding a splash of coconut milk or chicken broth to loosen the sauce. You can also freeze portions for up to 3 months in freezer-safe containers. Thaw overnight in the refrigerator before reheating. The peanut butter and coconut milk base freezes surprisingly well! Just add a bit more liquid when reheating as frozen/thawed sauces tend to be thicker.
Conclusion
This Thai Chicken Skillet (Fast and Flavorful) proves that restaurant-quality Thai food doesn’t require exotic ingredients, complicated techniques, or hours in the kitchen. In just 30 minutes with a single skillet, you can create a meal that rivals your favorite Thai restaurant—with the satisfaction of knowing exactly what went into it and the bonus of significantly easier cleanup.
What makes this recipe truly special is how it builds layers of flavor—the caramelized vegetables, the aromatic ginger and garlic, the creamy coconut-peanut sauce, the bright lime juice—each element contributing to a beautifully balanced dish that hits every note: sweet, savory, tangy, and spicy. Chef Rachel makes this regularly because it’s one of those rare recipes that tastes impressive enough for company while being simple enough for a Tuesday night.
Her friend Mery, the Thailand street food veteran, wasn’t exaggerating when she called this version “shockingly authentic.” The combination of peanut butter and coconut milk creates that signature Thai creaminess, while the fish sauce, lime juice, and lemongrass provide the authentic flavor profile that makes Thai cuisine so distinctive.
Ready for more quick Thai skillets? Try our 20-Minute Thai Peanut Noodles (One-Pan) for noodle-forward Thai flavors, or explore our Thai Basil Chicken Rice — Simple Dinner for aromatic basil-forward cooking.
The beauty of Thai Chicken Skillet (Fast and Flavorful) is how endlessly adaptable it is—use chicken or shrimp, add more vegetables, adjust the heat level, serve over rice or noodles—while always delivering that signature creamy sauce and bold Thai flavors. It’s the kind of recipe that earns a permanent spot in your rotation, the one you make when you need something fast but refuse to sacrifice flavor.
So grab that cast-iron skillet, open a can of coconut milk, and discover why this Thai chicken has become a weeknight staple for home cooks everywhere. Your kitchen will smell amazing, your family will be impressed, and you’ll wonder why you ever ordered Thai takeout!
More recipes in mealzyt.com.