
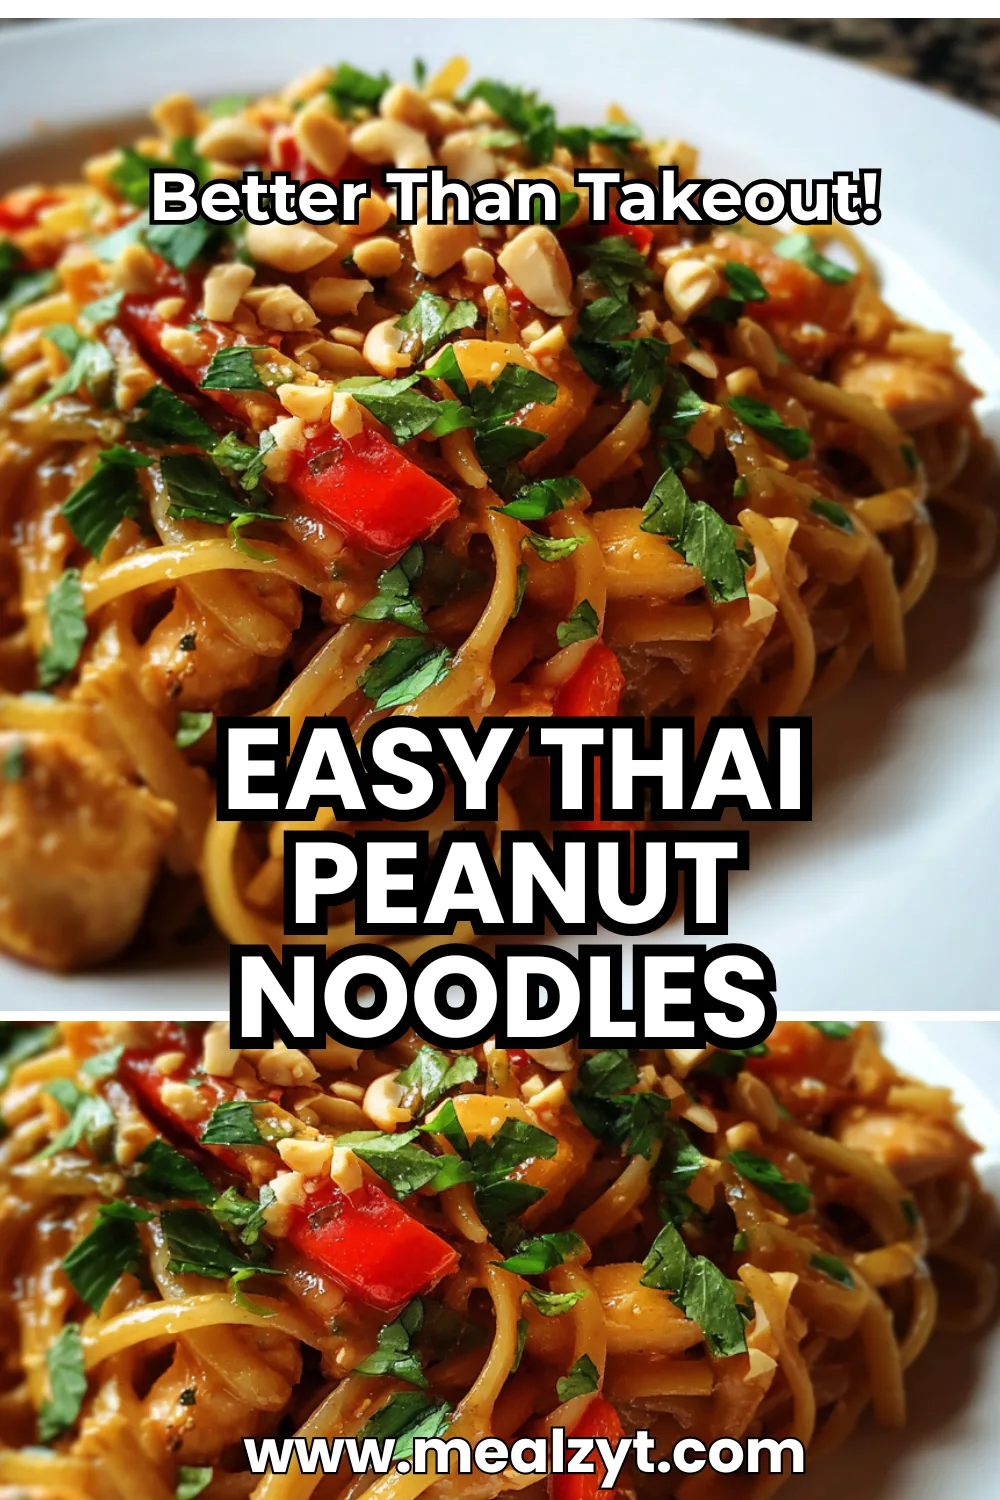
20-Minute Thai Peanut Noodles (One-Pan) is an addictively delicious, lightning-fast dinner that combines tender noodles with colorful vegetables and optional protein in a creamy, rich peanut sauce made from peanut butter, soy sauce, sesame oil, garlic, and ginger—everything comes together in a single pan for maximum flavor and minimal cleanup.
Chef Rachel developed this streamlined version after years of ordering Thai peanut noodles at restaurants and realizing she could make an even better version at home in less time than delivery takes, creating a Thai peanut noodles one pan technique that delivers restaurant-quality results with weeknight simplicity.
20-Minute Thai Peanut Noodles (One-Pan)
Ingredients
Equipment
Method
- Bring large pot of water to boil. Add noodles and cook according to package directions (4-6 minutes for rice noodles, 4-5 for pre-cooked udon). Drain and set aside.
- While noodles cook, add all sauce ingredients to jar: peanut butter, tamari, maple syrup, water, sesame oil, rice vinegar, chili sauce, grated garlic, grated ginger, and cornstarch. Put lid on and shake vigorously until smooth.
- Heat large skillet or wok over medium heat. Pour peanut sauce into hot pan.
- Cook sauce 3-4 minutes, stirring regularly, until thickened and glossy (should coat back of spatula).
- Add drained noodles to thickened sauce. Using tongs, toss noodles continuously 2-3 minutes until sauce is fully incorporated and everything is heated through.
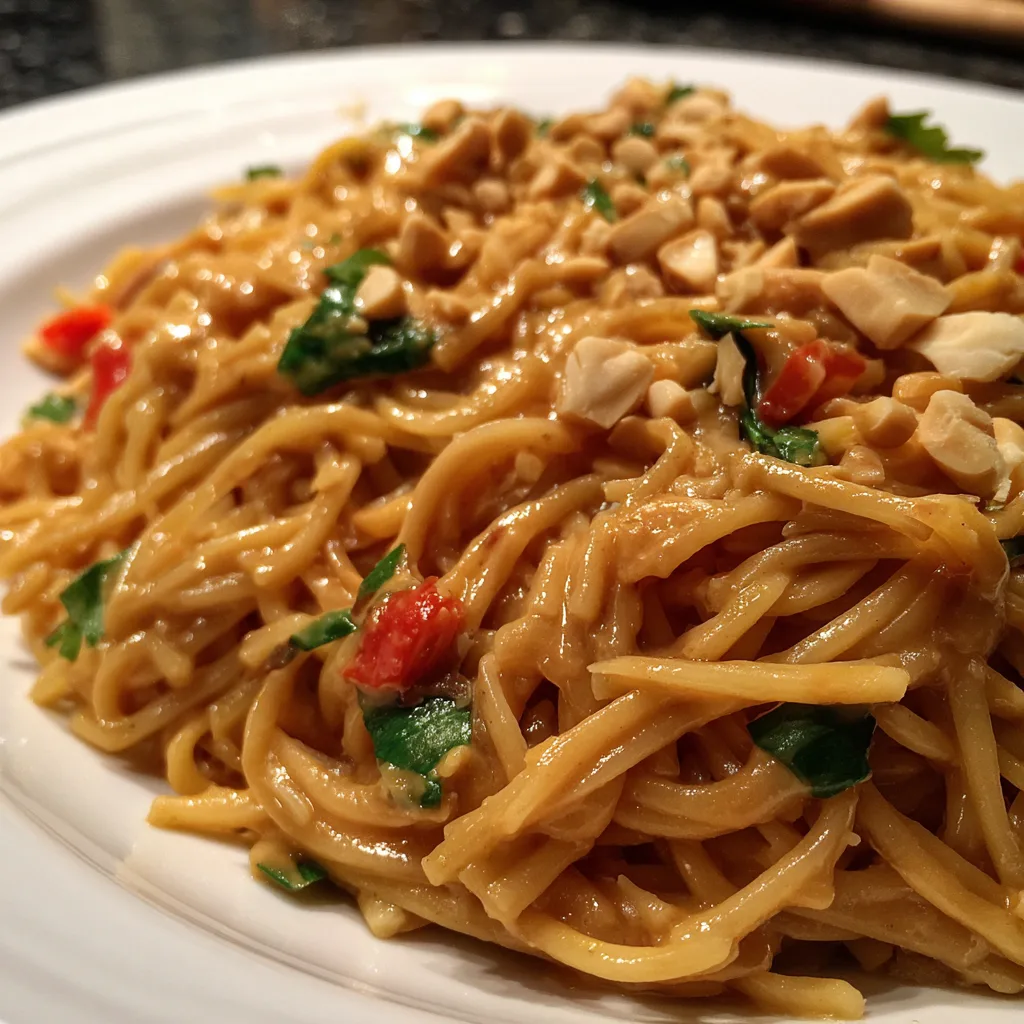
- Remove from heat and serve immediately. Garnish with chopped peanuts, cilantro, sesame seeds, and lime wedges.
- One-Pan Version with Protein & Vegetables:
- Make peanut sauce as directed, set aside. Cook pasta until al dente, drain, set aside.
- Heat ½ tablespoon sesame oil in wok over medium-high heat. Add 2 cups cubed chicken, stir-fry until ⅔ cooked. Transfer to bowl, cover, set aside.
- Add ¾ cup water and 3 cups sliced vegetables to pan. Cover and steam 3-4 minutes until tender-crisp.
- Add chicken, pasta, and peanut sauce back to pan. Mix gently. Decrease heat to medium, cover, cook until chicken is done (3-5 minutes).
- Garnish with green onions and serve!
Notes
Approximately 485 kcal per serving without protein/vegetables (4 servings) Protein
Approximately 16 g protein per serving from peanut butter
The genius of these 20-minute Thai peanut noodles lies in how the creamy peanut sauce thickens directly in the pan, then coats every strand of noodles in that glossy, intensely flavorful mixture. Unlike recipes where you toss cold noodles with sauce, heating the sauce first allows it to thicken properly and infuse the noodles more deeply.
Chef Rachel’s friend Mery, who spent months traveling through Thailand eating pad thai and other peanut noodle variations, taste-tested this recipe and was shocked by how the homemade version surpassed most restaurant versions—the sauce is fresher, the balance of sweet-savory-tangy is perfect, and you control exactly what goes into it. Whether you’re meal prepping for the week, need a quick lunch that actually satisfies, or want an impressive dinner that takes less time than ordering takeout, these Thai peanut noodles deliver every single time.
For more quick noodle dinners, explore our Thai Coconut Curry Noodles (One-Pot) or try our Thai Basil Chicken Rice — Simple Dinner for rice-based Thai flavors.
Summary
These 20-Minute Thai Peanut Noodles (One-Pan) combine your choice of Asian-style noodles with a creamy peanut sauce made from peanut butter, tamari, maple syrup, sesame oil, fresh garlic, ginger, and rice vinegar—the sauce thickens in the pan before the noodles are added, creating a glossy coating that clings to every strand. Add vegetables like bell peppers, snap peas, and carrots, plus optional chicken, tofu, or shrimp for a complete meal in under 20 minutes.
Why these 20-Minute Thai Peanut Noodles work:
- Faster than takeout—on the table in 20 minutes from start to finish!
- The sauce is unbelievably creamy—peanut butter creates rich, velvety texture
- One pan means easy cleanup—everything happens in a single skillet
- Incredibly versatile—works with any noodles, vegetables, and proteins you have
- Sweet-savory-tangy balance—maple syrup, soy sauce, and rice vinegar create complex flavor
- Meal prep champion—keeps beautifully for 4-5 days and reheats perfectly
- Budget-friendly—uses pantry staples and affordable ingredients
The key is thickening the peanut sauce in the pan first before adding the noodles—this ensures the sauce has the perfect consistency to coat the noodles rather than being too thin and watery.
Equipment
Essential tools for making 20-Minute Thai Peanut Noodles:
- Large pot – For boiling noodles
- Large skillet or wok – For cooking the sauce and tossing everything together
- Jar with lid OR medium bowl – For mixing the peanut sauce ingredients
- Colander – For draining noodles
- Measuring cups and spoons – For precise sauce ratios
- Microplane or fine grater – For grating fresh ginger and garlic
- Wooden spoon or silicone spatula – For stirring
- Whisk or fork – For mixing sauce ingredients
Optional but helpful:
- Chef’s knife for chopping vegetables
- Cutting board for prep work
- Tongs for tossing noodles with sauce
Ingredients
For the 20-Minute Thai Peanut Noodles (One-Pan):
Noodles:
- 1 pound (16 oz) Asian-style noodles (rice noodles, udon, soba, lo mein, or even spaghetti)
- 8 oz uncooked pasta if using regular spaghetti
Peanut Sauce:
- ⅓ cup creamy peanut butter (natural, no-sugar-added)
- ⅓ cup tamari or low-sodium soy sauce
- ¼ cup pure maple syrup (or honey, agave)
- ⅓ cup water
- 1 tablespoon toasted sesame oil
- 1 tablespoon rice vinegar
- 1-2 tablespoons chili garlic sauce or sriracha (adjust to taste)
- 1-2 cloves garlic, finely grated
- 1 teaspoon fresh ginger, finely grated
- 1½ teaspoons cornstarch or arrowroot starch (for thickening)
- Salt to taste
Optional Add-ins:
- 2 cups cubed chicken breast
- 3 cups mixed vegetables (bell peppers, snap peas, carrots, red cabbage, broccoli)
- ½ tablespoon sesame oil for cooking protein
- ¾ cup water for steaming vegetables
Garnish:
- ¼ cup chopped peanuts
- ¼ cup fresh cilantro, chopped
- 2 tablespoons toasted sesame seeds
- 2 green onions, sliced
- Lime wedges for squeezing
Ingredient notes:
- Peanut butter: Use natural, no-sugar-added creamy peanut butter; crunchy works too for extra texture
- Noodles: Rice noodles are traditional; pre-cooked udon noodles take only 4-5 minutes
- Tamari vs. soy sauce: Tamari is gluten-free and slightly thicker; both work perfectly
- Toasted sesame oil: Essential for authentic flavor—regular sesame oil lacks the nutty depth
- Fresh ginger and garlic: Vastly superior to dried or jarred versions
- Cornstarch: Creates that glossy, clingy sauce texture characteristic of Thai noodles
Directions
Step 1: Cook the noodles
Bring a large pot of water to a rolling boil. Add the noodles and cook according to package directions—most rice noodles take 4-6 minutes, while pre-cooked udon noodles need only 4-5 minutes. Cook pasta until just al dente if using regular spaghetti. Drain the noodles in a colander and set aside. Pro tip: If you’re worried about noodles sticking together while you prepare the sauce, toss them with a tiny bit of sesame oil.
Step 2: Mix the peanut sauce
While the noodles cook, prepare the peanut sauce. Add all sauce ingredients to a jar with a lid: peanut butter, tamari, maple syrup, water, sesame oil, rice vinegar, chili garlic sauce, grated garlic, grated ginger, and cornstarch. Put the lid on and shake vigorously until completely combined and smooth. Alternatively, whisk all ingredients together in a medium bowl. The sauce will be quite thick—this is exactly right!
Step 3: Heat and thicken the sauce
Heat a large skillet or wok over medium heat. Pour the peanut sauce into the hot pan. Let the sauce cook for 3-4 minutes, stirring regularly so it doesn’t burn on the bottom. The cornstarch will activate as the sauce heats, thickening it to a glossy consistency that coats the back of your spatula. This step is crucial—cooking the sauce concentrates the flavors and creates the perfect texture.
Step 4: Add noodles and combine
Once the sauce is thickened and glossy, add the drained noodles to the pan. Using tongs or two spatulas, toss the noodles continuously for 2-3 minutes until the sauce is fully incorporated into the noodles and everything is heated through. Every strand should be evenly coated with that gorgeous peanut sauce.
Step 5: Serve immediately
Remove the pan from heat and serve right away. Garnish generously with chopped peanuts, fresh cilantro, sesame seeds, sliced green onions, and lime wedges for squeezing. The lime juice adds a bright, tangy finish that’s absolutely essential!
One-Pan Version with Protein and Vegetables
For a complete meal in one pan:
- Make the peanut sauce as directed in step 2 and set aside.
- Cook pasta until al dente, drain, and set aside.
- Heat ½ tablespoon sesame oil in a wok or large high-sided pan over medium-high heat.
- Add 2 cups cubed chicken breast and stir-fry until about ⅔ cooked through. Transfer to a bowl, cover with foil, and set aside.
- Add ¾ cup water and 3 cups of your favorite sliced vegetables to the pan. Cover and steam 3-4 minutes until tender-crisp and bright.
- Add the chicken back to the pan along with the cooked pasta and peanut sauce.
- Mix gently until sauce is dispersed evenly. Decrease heat to medium, cover, and cook until chicken is fully cooked through (3-5 minutes).
- Garnish with green onions and serve!
Pro cooking tips:
- Don’t skip heating the sauce—this step thickens it properly and concentrates flavors
- Use toasted sesame oil—regular sesame oil doesn’t have the same nutty depth
- Grate ginger and garlic fresh—the flavor difference is dramatic
- Adjust consistency—add more water if sauce is too thick, simmer longer if too thin
- Serve immediately for best texture—noodles can absorb sauce and dry out if they sit
Tips and Variations
Customizing Your Thai Peanut Noodles
Noodle options:
- Rice noodles (traditional): Pad Thai-style rice noodles work beautifully
- Udon noodles: Thick, chewy, and satisfying—pre-cooked versions are fastest
- Soba noodles: Buckwheat noodles add nutty flavor and extra protein
- Lo mein or ramen noodles: Work perfectly in this recipe
- Regular spaghetti: Not traditional but absolutely acceptable
- Zucchini noodles: For low-carb version—add them raw directly to the hot sauce
Protein additions:
- Chicken: Cube and stir-fry before adding vegetables
- Tofu: Cube extra-firm tofu, pan-fry until crispy, add at the end
- Shrimp: Add raw shrimp with vegetables, cook just until pink
- Edamame: Adds plant-based protein and beautiful green color
- Chickpeas: Roasted chickpeas add protein and satisfying crunch
- Eggs: Top each serving with a soft-boiled or fried egg
Vegetable variations:
- What works well: Bell peppers, snap peas, carrots, red cabbage, broccoli, green onions
- Quick-cooking: Thinly sliced peppers, julienned carrots, snap peas
- Hardy vegetables: Broccoli, cauliflower—blanch or steam first
- Fresh herbs: Cilantro, Thai basil, mint add brightness
- Keep vegetables colorful: Use a mix of red, orange, green, and purple for visual appeal
Adjusting flavors:
- More sweet: Increase maple syrup to ⅓ cup
- More savory: Add an extra tablespoon of tamari/soy sauce
- More tangy: Increase rice vinegar to 2 tablespoons or add lime juice
- More spice: Double the chili garlic sauce or add fresh sliced chilies
- More nutty: Add an extra teaspoon of toasted sesame oil
Peanut butter substitutes:
- Almond butter: Creates slightly different but delicious flavor profile
- Cashew butter: Milder, creamier texture
- Sunflower seed butter: Perfect for nut-free version
- Tahini: For sesame-forward flavor (not traditional but tasty)
Making it healthier:
- Reduce sugar: Use less maple syrup or substitute with date paste
- Increase vegetables: Double or triple vegetable content
- Use whole grain noodles: Brown rice noodles or whole wheat pasta
- Reduce sodium: Use low-sodium tamari and reduce quantity
Meal prep strategies:
- Store in airtight containers in the fridge for 4-5 days
- Reheat in microwave or on stovetop with a splash of water
- The flavors actually deepen as they sit—leftovers are amazing!
- Freeze portions for up to 3 months
- Store extra peanut sauce separately to refresh leftovers
Nutrition Facts
| Nutrient | Per Serving (without protein/vegetables, 4 servings) |
|---|---|
| Calories | 485 kcal |
| Protein | 16 g |
| Total Fat | 16 g |
| Saturated Fat | 2 g |
| Carbohydrates | 72 g |
| Dietary Fiber | 4 g |
| Sugars | 15 g |
| Cholesterol | 0 mg |
| Sodium | 780 mg |
| Potassium | 285 mg |
| Vitamin A | 2% DV |
| Vitamin C | 3% DV |
| Calcium | 4% DV |
| Iron | 12% DV |
Nutritional analysis based on 4 servings using rice noodles and peanut sauce, excluding additional vegetables or protein. Add ~150 calories if including chicken and vegetables.
Nutritional Highlights
Plant-based protein powerhouse: With 16 grams of protein per serving from the peanut butter alone, these noodles provide substantial protein without any animal products. Add tofu, chicken, or edamame to boost protein even further.
Healthy fats from peanuts: Peanut butter provides mostly monounsaturated and polyunsaturated fats that support heart health. Peanuts are also rich in vitamin E, an important antioxidant. The sesame oil adds additional healthy fats.
Complex carbohydrates for energy: The 72 grams of carbohydrates from noodles provide sustained energy, especially important for active individuals. Rice noodles are naturally gluten-free and easy to digest.
Rich in minerals: Peanuts provide magnesium, phosphorus, and potassium—all essential minerals for bone health, energy production, and proper muscle function. The 12% daily value of iron supports oxygen transport in the blood.
Anti-inflammatory ingredients: Fresh ginger contains gingerol, garlic provides allicin, and sesame oil offers sesamol—all studied for anti-inflammatory and antioxidant properties.
Moderate sodium: At 780mg per serving, sodium is moderate primarily from the soy sauce/tamari. Use low-sodium versions to reduce this further if needed.
Dietitian Tips
For balanced nutrition: This dish is carbohydrate-forward as written. For better balance, increase the vegetable content to 2-3 cups per serving and add a protein source like chicken, tofu, or edamame. This creates a more complete meal with better macronutrient ratios.
For weight management: At 485 calories per serving without added protein or vegetables, this is a moderate meal. To reduce calories while increasing satiety, use half the noodles and double the vegetables. The fiber from vegetables promotes fullness with fewer calories.
For athletes and active individuals: The combination of carbohydrates from noodles and protein from peanut butter makes this an excellent post-workout meal. The carbs replenish glycogen stores while protein supports muscle recovery. Add extra protein for optimal recovery.
For blood sugar management: The protein and fat from peanut butter naturally slow carbohydrate absorption, preventing blood sugar spikes. For tighter control, use whole grain or brown rice noodles for added fiber, reduce maple syrup, and increase vegetable content.
For heart health: Peanuts support cardiovascular health through their healthy fat profile and antioxidants. To optimize heart health benefits, use low-sodium tamari, increase vegetables (especially colorful ones rich in antioxidants), and consider adding omega-3 rich additions like edamame.
For digestive health: Fresh ginger supports digestion and may reduce nausea and bloating. The fiber from peanut butter and vegetables feeds beneficial gut bacteria. Rice noodles are gentle on the digestive system and naturally gluten-free.
For families with picky eaters: The creamy peanut sauce appeals to most palates, including children. Start with minimal chili sauce for mild flavor, then let individuals add heat to their preference. The familiar peanut butter flavor makes this recipe kid-approved!
Allergen considerations:
- Contains peanuts—substitute with sunflower seed butter for nut-free version
- Contains soy (tamari/soy sauce)—use coconut aminos for soy-free
- Naturally dairy-free and vegan (when using maple syrup instead of honey)
- Gluten-free when using rice noodles and tamari
FAQs – 6 Frequently Asked Questions
Q1: Can I use crunchy peanut butter instead of creamy?
A: Absolutely! Crunchy peanut butter works perfectly and adds extra texture to the sauce. Some people actually prefer it because the little peanut bits create additional interest in every bite. The sauce will be slightly less smooth and uniform, but it will taste just as delicious. Just be aware that crunchy peanut butter may not blend quite as seamlessly into the sauce initially, so make sure to whisk or shake extra thoroughly when combining the sauce ingredients. If you want the best of both worlds, use creamy peanut butter for the sauce and then garnish generously with chopped peanuts on top—this gives you a smooth sauce with crunchy texture elements. Natural peanut butter (the kind where oil separates on top) works great, but make sure to stir it thoroughly before measuring so you get the right consistency.
Q2: Why do I need to heat the peanut sauce before adding the noodles?
A: Heating the sauce first serves several important purposes! First, it activates the cornstarch which thickens the sauce to create that glossy, clingy coating characteristic of restaurant-style peanut noodles. Without heating, the sauce would remain thin and watery and wouldn’t coat the noodles properly—it would just pool at the bottom of your bowl. Second, heating concentrates the flavors and allows them to meld together—the garlic and ginger become more aromatic, and all the ingredients marry into a cohesive sauce. Third, warming the sauce before adding noodles ensures the noodles heat evenly without overcooking. If you added cold sauce to hot noodles, you’d need to cook them longer to heat the sauce, which would overcook the noodles. The 3-4 minutes of simmering the sauce is essential—don’t skip this step! Stir regularly so it doesn’t burn, and you’ll see it transform from thin liquid to thick, glossy perfection.
Q3: Can I make these Thai peanut noodles ahead for meal prep?
A: Yes! These noodles are excellent for meal prep and actually taste even better the next day as the flavors continue to develop. Let the noodles cool completely, then portion into airtight containers and store in the refrigerator for 4-5 days. When reheating, add 1-2 tablespoons of water and heat gently in the microwave (stirring halfway through) or on the stovetop. The added liquid prevents the noodles from drying out—they’ll absorb some of the sauce as they sit, so they need a bit more moisture when reheating. Some people prefer to make extra peanut sauce and store it separately, then toss a spoonful with leftovers when reheating to refresh them. You can also freeze portions for up to 3 months in freezer-safe containers. Thaw overnight in the fridge before reheating. If you’re meal prepping with vegetables and protein, those hold up beautifully too. This is one of Chef Rachel’s favorite meal prep recipes because it’s just as good (if not better!) on day 3 or 4!

Q4: What if my peanut sauce is too thick or too thin?
A: Peanut butter consistency varies by brand (natural vs. processed, different fat contents), so you may need to adjust the sauce slightly. If your sauce is too thick (looks pasty or doesn’t coat the back of your spatula smoothly), add water 1-2 tablespoons at a time while heating, stirring well after each addition until you reach the desired consistency. The sauce should be thick enough to coat the back of a spatula but still pourable. If your sauce is too thin (looks watery and doesn’t cling to noodles), let it simmer uncovered for an additional 2-3 minutes to reduce and thicken. You can also mix ½ teaspoon cornstarch with 1 tablespoon cold water, stir it into the sauce, and simmer for another minute—the extra cornstarch will thicken it. Keep in mind that the sauce will thicken as it cools, and noodles will absorb some of it, so err on the side of slightly thinner rather than too thick. You can always make a little extra sauce to toss with leftovers!
Q5: Can I make these noodles without the spicy chili sauce?
A: Absolutely! The chili garlic sauce (or sriracha) adds heat but isn’t essential to the core flavor of the dish. Simply omit it completely for a mild, family-friendly version that kids will love. The peanut sauce will still be incredibly flavorful from the peanut butter, tamari, maple syrup, garlic, ginger, and sesame oil. You’ll have a sweet-savory profile without any heat. If you want just a tiny bit of warmth without actual spiciness, add a small pinch of white pepper or a few drops of hot sauce that you can control. For families with mixed heat preferences, make the base sauce mild, then let individuals add their own sriracha, chili crisp, or sliced fresh chilies at the table. This way everyone gets exactly the spice level they want! The cayenne pepper in some versions is also completely optional.
Q6: What type of noodles work best for Thai peanut noodles?
A: The beauty of this recipe is its versatility—almost any noodle works! Rice noodles (especially pad Thai-style) are most traditional and provide authentic texture and flavor. They’re also naturally gluten-free. Udon noodles are thick, chewy, and incredibly satisfying—the pre-cooked versions that only need 4-5 minutes in boiling water are especially convenient. Soba noodles made from buckwheat add a nutty flavor and extra protein. Lo mein or ramen noodles work perfectly and are what many Chinese restaurants use. Regular spaghetti or linguine aren’t traditional but work great if that’s what you have—just cook to al dente. Zucchini noodles or shirataki noodles are excellent low-carb options—add them directly to the hot sauce without pre-cooking. The key is cooking whatever noodles you choose just until al dente (slightly undercooked) since they’ll continue softening as you toss them with the hot sauce. Choose based on what you have, your dietary needs, and your texture preference—they’ll all be delicious!
Conclusion
These 20-Minute Thai Peanut Noodles (One-Pan) prove that incredible Thai-inspired food doesn’t require hours of preparation, hard-to-find ingredients, or a culinary degree. In just 20 minutes with ingredients you likely have in your pantry right now, you can create a meal that rivals your favorite Thai restaurant—but fresher, healthier, and customized exactly to your taste.
What makes this recipe truly special is how such simple ingredients—peanut butter, soy sauce, maple syrup, garlic, ginger—transform into something so crave-worthy that you’ll make it weekly. Chef Rachel has this recipe memorized because she makes it so frequently, often doubling the batch so she has quick lunches ready for the entire week. It’s become her answer to “what’s for dinner?” on those evenings when she needs something fast but refuses to sacrifice flavor.
Her friend Mery, the Thai food purist, wasn’t exaggerating when she declared the homemade version superior to most restaurants. The sauce is fresher, the balance is perfect, and you control the heat level, sweetness, and every other element to make it exactly how you like it.
Ready for more quick noodle dinners? Try our Thai Coconut Curry Noodles (One-Pot) for coconut-forward flavors, or explore our One-Pot Thai Lemon Grass Chicken for aromatic lemongrass rice.
The beauty of 20-Minute Thai Peanut Noodles is how endlessly adaptable they are—use rice noodles or spaghetti, add chicken or tofu, load up on vegetables or keep it simple, make it spicy or mild—while always delivering that signature creamy peanut sauce that makes every bite addictive. It’s the kind of recipe that earns a permanent spot in your rotation, the one you make on autopilot when you need something fast, satisfying, and genuinely exciting.
So grab that jar of peanut butter, cook some noodles, and discover why peanut noodles are one of the most beloved dishes across Thai, Chinese, and Southeast Asian cuisines. Your taste buds will thank you, your family will request it weekly, and you’ll wonder why you ever ordered takeout!
More recipes in mealzyt.com.